Wednesday, October 31, 2012

SOTM Blog Hop November 2012


Just got back from vacation on Monday.....and I took craft supplies with me, well doesn't everyone?  Three days before our trip was over.....I pulled out the November SOTM set "Capture the Date" S1211.  As I looked at this set, I thought what could I make that would be really fun?  During our trip we make many stops and I started picking up fliers at each place we visited and it hit me....how about a vacation smash book? 
Now, let's get started. 
 If you are coming here from Kami Welter's Blog you're on the right path.....and if you get lost along the way, its easy to get back on track, just go to HelenOnulak's Blog for a full list of hoppers. We have an amazing group of 68 Consultant's participating this month!  
There are a lot of pictures on this post, hope you enjoy :)
 The cover was made with a bag from one of the wineries I visited on my trip.  I embossed it with Cashmere pigment ink (Z2503) and clear embossing powder (Z821), then distressed the paper with a variety of pink and purple inks.  First embossing the cover with black ink for "October 2012"
 The cover is still not done, but close enough for the hop......I used a cabinet knob and part of the wine bag handle for the cover.  Now, I actually needed one more page in the book and due to the thickness it wouldn't close, so I had to make a foe closing cover with the My Creations Bookmark Album Z1740.  It turned out really well this way.
 Layout One
 Page One
 Center Page
 Page Three


Each page is done with a jounaling stamp featuring the date of our trip and is inserted behind a picture....The road map signs are of the highways we traveled for the wineries :).....yummy!  So close to being done, the journaling will be done in the next few days.
 Layout Two
 Journaling Spot
 Additional Journaling Spot
 Page Two
 Layout Three
 Page One
 Page Two
 Layout Four
 Page One
 Page Two
 Layout Five
Page One
 Page Two
 Layout Six
 Page One
 Page Two

Here's a great image of the full set, it fits all your calendaring needs, that's for sure.

Contact me and ask me how you can get your's for just $5.00
Now "Hop" on over to Angel Sawyer's Blog and see her amazing work!
Thanks for stopping by :) and...stay inking my friends.

Friday, October 26, 2012

Funny Pictures from Vacation

Super quick post.....here are 2 comical pictures from our vacation.

First, we went to Virginia for our annual fall leaf season trip and guess what.....no leaves, lol
 and....we did find some leaves, and Todd decided to go camouflage on me.....
Have a great weekend.

Wednesday, October 24, 2012

Fun Things Happen When You Least Expect Them

While on vacation in the cottage on the mountain in Virginia I sit creating the WOTG Club layouts for November using the Clementine Paper Packet from CTMH....... since I don't scrapbook a lot it is easy to do the layouts but hard to come up with titles and so on.....so me and "two buck chuck" decided to take a break and have some fun.  Well if you are from the South you will know who "two buck chuck" is and if you don't let me fill you in......

In Florida when I create after work I have a glass of what I call my walmart special wine, but while on vacation I learned a new phrase "two buck chuck" and that is the cheap stuff....wine that is.....now the wine I drink is not $2, but is is cheap, what the heck, after a glass who cares, right???  Anyways, this is what we came up with just playing around.

Zinnias.....little paper embossed zinnias....love them.....I used the Clementine Scrapbooking Workshop Stamp Set C1513 and the new mini pigment ink stamp pads in Twilight, Sunset and Honey.  When CTMH came out with these mini pigment stamp pads I sold all my embossing powders, no need for them anymore.....I use the pigment inks and clear embossing powder and I have all the color choices right there waiting for me to have fun with.  First, stamp the images in your favorite color choice and cut around the image leaving some colonial white card stock on the edge, don't worry if it isn't perfect, it won't matter when your flowers are done.
 Next...not a good picture, but those are my scissors, cut down the middle of each petal.
Ok please ignore my old ugly piercing mat....I ordered another one, had it for one week and it disappeared?????  Once you have cut between each petal, take your bone folder and push it down in the center of each flower on your piercing mat, next with a stylists or piercing tool curl the petals of your flower.  You need to cut each embossed flower just about to the center.
 See how the flowers on the left curl up compared to the ones on the right?
Once you have done this with all the layers of your flower you will begin assembling them.  I used 2 of the 10 petal flowers, 1 of the 5 petal flower and 1 of the 8 petal circle flower. To create a different feel and dimension for the flowers ink the stamp directly for one, then stamp it second generation or swipe the pad across the stamp for a more uneven look.  On one flowers I used the star flower.  To assemble use liquid glass, just a drop in the center of the first 10 petal flower, then layer, add liquid glass to the center of each layer.
 With each layer you will push down with your bone folder to give the flower more dimension.
And here is the finished project.  Once dry you can use your stylist or piercing tool to curl your flower petals for more fluff :)  The only thing that could make these flowers better would be some chunky glitter, 
now that's a thought.

Have a great evening and remember to stay inky my friends.

Monday, October 22, 2012

Halloween Star

Halloween is my favorite holiday of the year, mostly because I like the vintage feel of orange and black.  Using the new dimensional star from CTMH and the exclusive paper packet from the Halloween Workshop on the Go and the new Artiste Cricut Cartridge, all of which are available right here on my blog, I made this beautiful wall hanging to add to my collection of vintage Halloween decor.
Click here for the star cutting template. Make sure you save this PDF file on your computer for future use. 
The boo, spooky, cat and spiders were cut using the Artiste cartridge with black glitter paper and the witch and bats were cut using one of Tim Holtz dies with a patterned glitter paper. The ribbon used is the new black tulle from CTMH. 
Below are some up close pictures of the patterned glitter paper on the witch and other cut images.
Have a spooky week and remember to stay inky :)

Sunday, October 21, 2012

Mixing it Up


Its always such a pleasure and a surprise when a friend asks you to make a special project.  My friend Cynthia wanted handmade party invitations for her 5 year old, almost 6 year old daughter's birthday party this October.  Last year she wanted ponies and this year she wanted alligators.....and this is what I came up with. 
An easel card....on the front it says "See you later Alligator" and the inside has all the party info.
And to make it even better....Cynthia came over and we assemble 15 invites in 2 hours....a fun afternoon with a great friend, who could ask for more?
Her daughter's name is Ava....so I found a way to stick that in too!
The alligator was cut using the Nate's Alphabet cartridge.
Another fun thing about making a special project is using my stash of assorted of stamps, and of course I used CTMH and one of my favorite paper packets, Dotty for You.
I hope you had a great weekend.  Stay inky my friends.


Sunday, October 14, 2012

Spooky Fun for Halloween


If I haven't said it lately, I'll say it today.....I LOVE the Circut Artiste Cartridge exclusive to CTMH!  Get one today by shopping with me right here right now.....This cartridge has everything you need for any occasion.   What creepy coffin this turned out to be.  The coffin was cut at 4 inches.  Next I made a template to cut away part of the coffin to expose the skeleton inside :)
Before assembling, randomly stamp your favorite images.  I am in awe over our new mini pigment colors.....so much that I sold all my embossing powders, no need for them anymore.  Pigment ink is perfect for embossing.   It's simple.....ink, stamp, add clear emboss, heat and your done......40 fabulous ink colors = 40 embossing colors.
Pop up an image or two, add some pearl paint and stickles and your done.

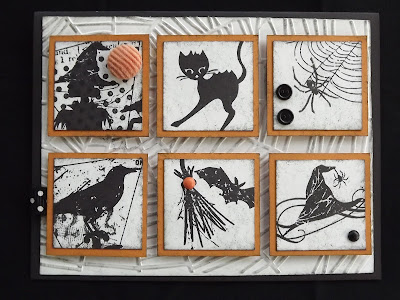
Not sure what to do for a fun Halloween project....how about this 10 minute card.  Its super easy and super quick.  Cut 6 pieces of colonial white cardstock, randomly stamp some of your favorite images, layer on colored cardstock, add a few embellishments and pop up the squares.

I also entered the coffin in the paper cabana challenge blog, check out more here.